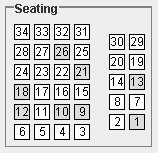
Simple seating charts in which the seats are aranged in two rectangular sections with a center isle, can easily be set up by putting the appropriate lines in the teacher configuration file. Use the left and right key words to describe the seat numbers in the left and right rectangular sections as viewed by the teacher when facing the class. Each seat has a unique seat number which greater than or equal to 0. Below is an example of two lines that can be put into a teacher configuration file to describe a classroom with 34 seats.
left 34 33 32 31, 28 27 26 25, 24 23 22 21, 18 17 16 15, 12 11 10 9, 6 5 4 3
right 30 29, 20 19, 14 13, 8 7, 2 1
Each line has groups of integers separated by a comma, one group per row of seats. In a given line, all of the groups must have the same size. In the above example, on the left there are 6 rows of 4 seats and on the right there are 5 rows of two seats. The first group represents seats in the back row, numbered left to right. This will produce a seating chart similar to the one in Figure 1. The seats with gray background correspond to seats that have been assigned to students. They change colors as student sign in and respond to queries.
| Figure 1: | A simple seating chart. |
Seat number do not have to be consecutive and are not restrictred to 2 digits. A value of -1 is treated as a missing seat position. If seat numbers have more than 2 digits, the numbers will not fit in the boxes of default size. The default size is 20 by 20 pixels and can be changed using the seatsize teacher configuration option.
If the classroom consists of a single rectangular array of seats, the right section can be left out by using the specification:
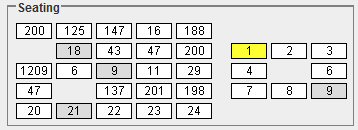
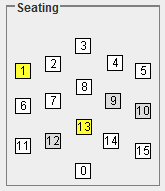
right !Seating configurations can be stored in a file which can be referenced in the teacher configuration file. This allows you to set up one file for each classroom configuration and reuse it for different classes in that room. Below is a seating configuration with an unusual assigment of seat number. The result is shown in Figure 2. A student has signed in at seat number 1.
seatsize 40 20
left 200 125 147 16 188, -1 18 43 47 200, 1209 6 9 11 29, 47 -1 137 201 198, 20 21 22 23 24
right 1 2 3, 4 -1 6, 7 8 9
Figure 2: A simple seating chart with unusual arangement.
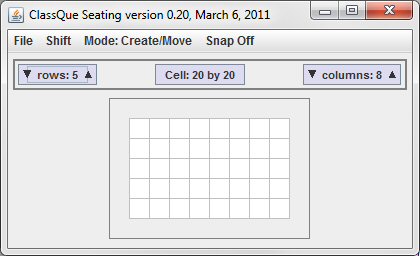
You can design a customized seating arangment in which the seats do not need to be in rectangular patterns with the classqueseating.jar program. Start this program by clicking on it or by executing:
java -jar classqueseating.jarThis will bring up a window similar to the one in Figure 3.
Figure 3: The initial window of the classqueseating program.
The File menu allows you to save the result in a seating configuration file, load a previously created seating confiuration file, or display what would be put into a configuration file if saved.
You can change the number of rows and columns by clicking on the appropriate arrows in the rows or columns buttons and you can change the cell size by clicking on the Cell: button. When decreasing the number or rows, if the bottom row is empty, it will be removed. Otherwise, if the top row is empty, it will be removed. You cannot remvoe a row if both the top and bottom rows contain cells, or parts of cells.
Initially, there are no seats in the chart.
The program has 5 modes of operation determined by the Mode menu item. The default mode is Create/Move. The modes are described below.
Create/Move Mode
In this mode, clicking on an empty sell inserts a seat at that cell position. This inserts a seat whose seat number is one larger that the largest seat used so far, starting with 1. Clicking on an existing seat allows you to drag it to another location. It does not have to be on a cell boundary. The number of seats created is restricted to the number of available cells, but the seats do not have to be in any particular cell, and can even overlap. If Snap (controlled by the Snap menu item) is on, then a seat moved close to the center of a cell boundary will move to the center of the cell.Delete
This allow you to delete a seat by clicking on it.Change Seat
In this mode, clicking on an existing seat allows you to change the seat number. You may not change the number to that of an existing seat or make it negative.Select
In this mode, clicking on a seat either selects it or deselects it. Selected seats are shown in blue. Selected seats are used by the Shift operations. (See below.)Info
In the mode, moving the cursor over a seat or cell displays a tool tip with information about that cell or seat.The Shift allows you to shift some or all of the cells by 1 pixel, 5 pixels, or 1 cell in the directions left, right, up, and down. In Select mode, only those cells that are selected will be moved. In other modes, all cells will be moved.
A move operation that will move any part of a cell outside the grid will be ignored.
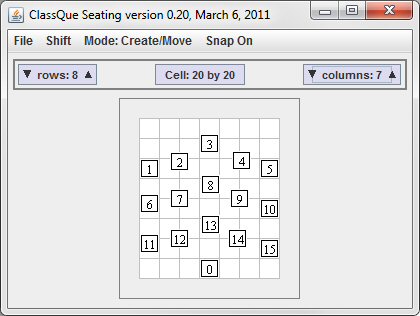
Figure 4 shows the seating program window after a number of changes have been made. The corresponding seating chart is also shown.
Figure 4: A custom seating chart.
Return to the main ClassQue page
