This simulator is a single program that shows a teacher window and a class of eight students, three of whom have signed in. You can start the simulator from the included classquesimulation.jar file or from the web by accessing the following web page:
/classque/run/simulation.html
The two ways of running the program are similar, but if started from a browser, you will not be able to access any local files.
If all goes well, starting the simulator this will bring up four windows: a teacher window and three student windows.
Queries
One of the main uses of ClassQue is to pose questions to students and collect their answers. ClassQue refers to these questions as queries.ClassQue supports 5 types of queries:
- Choice: Choose one from a list of answers
- Checkbox: Choose one or more from a list of answers
- Integer: Enter an integer
- Free Form: Enter text
- Code: Enter code
Queries also allow annotations, so you can embed comments and the correct answer to be reported later.
Queries are typically stored in a query file and created with the ClassQue Query Creator utility.
Queries can also be grouped into collections called surveys. Surveys allow you to deliver a group of questions.
The simulator has a sample query file loaded and we will use these queries in the examples.
The ClassQue Suite has a large number of features. This quick guide will get you started, but is far from complete.
Starting the ClassQue Simulator
You can start the simulator on most systems by double clicking on the classquesimulation.jar file. Alternatively, you can start is by executing the following command from a command window:java -jar classquesimulation.jar
If the java executable is not in the user's path, you might need to give the full path.
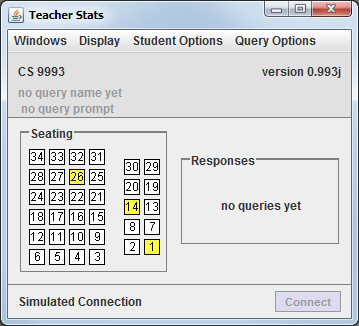
When you start the similator, 4 windows should appear. The largest of these is the teacher window which should be similar to Figure 1.
| Figure 1: |
Main teacher window with students signed in on machines 1, 14, and 26. |
Sending Queries to Students
Click on the Windows menu item and choose the first entry: Query Menu to bring up a new window similar to the one in Figure 2.
Figure 2: The teacher query menu.
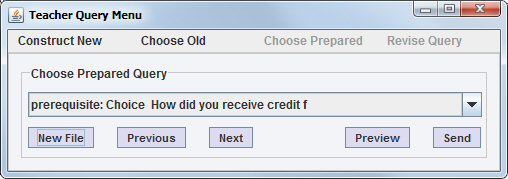
Click on New File to choose a file of queries that you previously created with the Query Creator, or you can choose a query from those already loading in the simulator. The name of the first query and the start of its prompt are shown in the combo box. You can use this combo box to select any of the queries from the file directly, or you can use the Previous and Next buttons to select other queries. Use the Preview button to see the full query as the students will see it.
Make sure the first query in the file is selected, the one named prerequisite and click Send to send this query to the students. Each connected student will see a window similar to Figure 3.
Figure 3: A student window after choosing an answer.

Viewing Query Results
The Teacher Stats window will now look like the one in Figure 4.
Figure 4: The Teacher Stats window after three students have
answered the query.
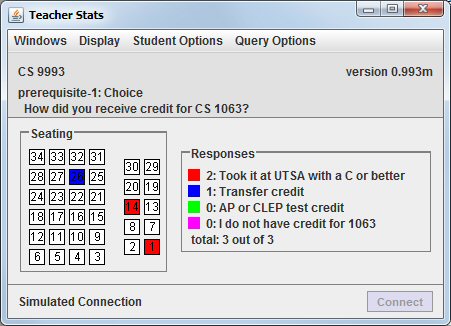
For Choice and Checkbox type queries, the default display shows the prompt, the seating chart, and the number of responses for each possible answer. The color of the box of in the seating chart indicates which answer was given by the student in that seat.
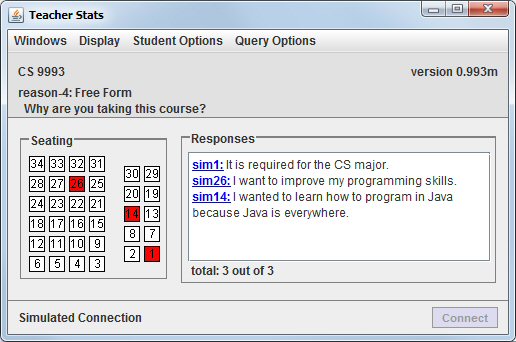
In the Teacher Query Menu, choose the 4th query (with the name reason), and push the Send button.
This is a free form query. Each answer is shown on a separate line in the order that the answers were given.
Figure 5: The Teacher Stats window for a free form query.
Using Surveys
Normally, when you send a query to the students, they only see the query that was most recently sent. Students cannot work on another query until a new one is sent, and after that time they no longer have access to the previous query. A survey is a collections of queries. It is like a quiz, containing several questions, but we avoid this terminology since quiz often implys grading and directly affecting course grades. Surveys are mainly for teaching, not for evaluation.When a survey is sent to the students, the students have access to all of the queries of that survey and can move among these queries. Similarly, the teacher can look at each of the queries in the current survey. This allows students to work at their own pace.
Query files containing surveys can be created with the Query Creator. The teacher sends a survey to the students by choosing a Survey Start item from the Choose Prepared Query combo box of the Query Menu. The survey consists of all queries between the Survey Start and Survey Emd.
Return to the main ClassQue page
