You will need a copy of the classquequerycreator.jar file.
Queries
One of the main uses of ClassQue is to pose questions to students and to collect their answers.ClassQue refers to these questions as queries.
ClassQue supports five types of queries:
- Choice: Choose one from a list of answers
- Checkbox: Choose one or more from a list of answers
- Integer: Enter an integer
- Free Form: Enter text
- Code: Enter code
Each query has a prompt (the question), a name (the title of the query), and in the first two cases a list of possible answers. Annotations can be attached to the prompt or the last of possible answers.
Queries are typically stored in a query file that contains one or more queries. These files have a special format and are created with the ClassQue Query Creator utility, which provides an intuitive GUI for query creation. Queries in a file can also be grouped into collections called surveys.
Query Creator Overview
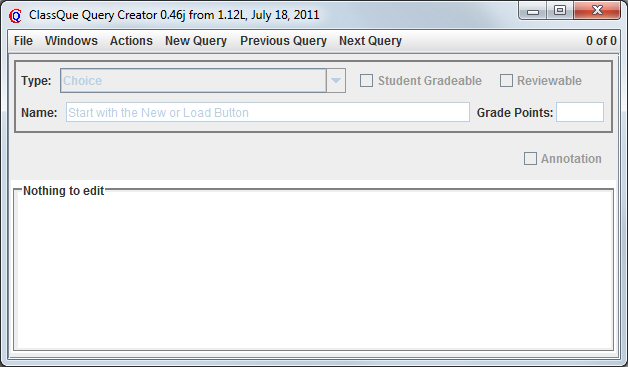
The Query Creator is used to create and modify files containing a collection of queries. When you run the Query Creator, initially two windows are available. The main window (Figures 1 and 2) allows you to read in a file of previously created queries, create new queries, select one of the queries (the current query) to modify, make modifications to the current query, and save queries to a file. The main window has three parts. At the top, the type and name of the current query are shown and can be modified. The middle section has widgets that allow you to select parts of the current query to modify, and the bottom sections has an edit window allowing you to modify a part of the query.The ClassQue Query Preview (Figure 3) shows the current query in a form similar to what a student would see. If the Annotations box of the window is checked, then annotations are also shown.
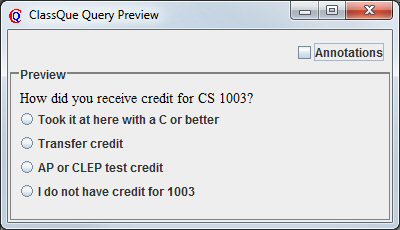
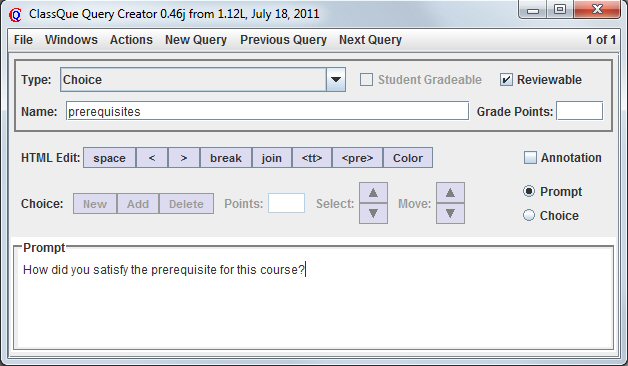
Figure 1 shows the main window after a query file has been read in. The current query is number 1 of 12, as indicated in the upper right corner. The current query is a choice query and the prompt is available for editing in the bottom section of the window. In the preview window (Figure 3) you can see that there are 4 possible answers.
Figure 2 shows the main window after the Choice radio button has been chosen and the Choice Select has been moved to the second choice. This allows you to edit this choice.
Figure 1: The main window after a query file has been read.
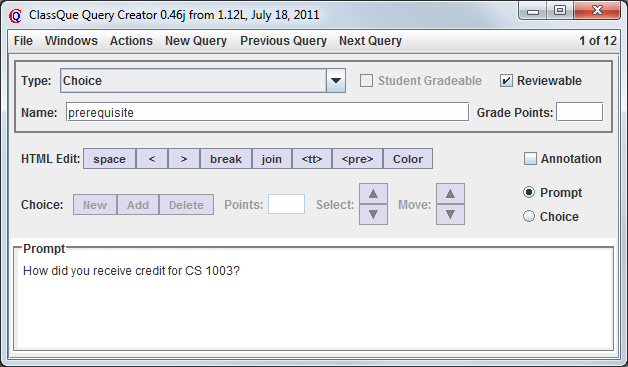
Figure 2: The main window in which a choice is being edited.
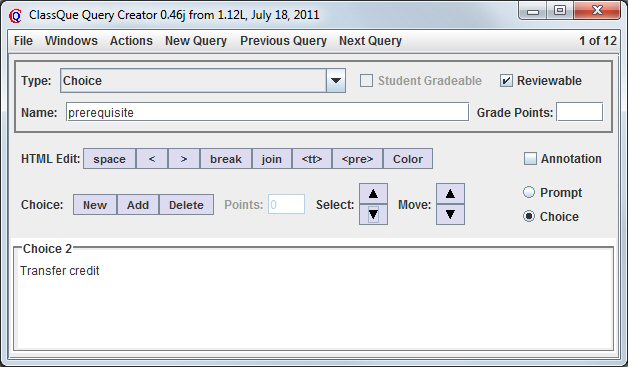
Figure 3: The preview window corresponding to Figure 1.
The prompt and choices are entered in HTML format. Annotations are entered as ordinary text. When editing a prompt or choice, the HTML Edit widgets allow you to easily enter some simple predefined HTML tags. Recall the HTML ignores line breaks in the input and line breaks are formed using the <br/> tag. Pushing the return key when editing HTML will enter this tag.
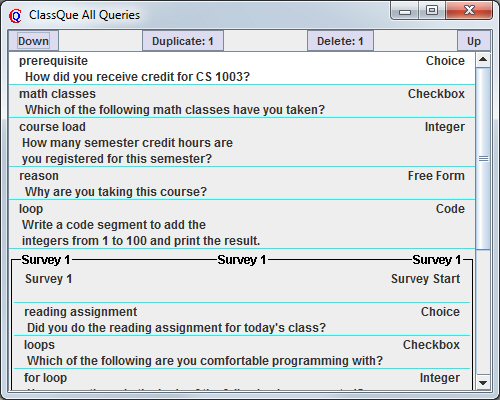
Another useful window is the All Queries window, as displayed in Figure 4. You can show this window by using the Window menu item of the main window and selecting All Queries. The window shows the prompt for each query and allows you to select the current query by clicking on it. It can also be used to move, duplicate, or delete collections of queries. You can select a range of queries by clicking on one and shift clicking on another.
Figure 4: The All Queries window corresponding to Figure 1.
Running the ClassQue Query Creator
You must have Java installed on your machine to run the ClassQue Query Creator program.
If you are using windows, you can run the program by clicking on
the classquequerycreator.jar file on your desktop or from an
explorer window.
On a Linux machine, make sure the classquequerycreator.jar file
is executable, right click on it and choose the appropiate version of Java
to run it. Alternatively,
from a terminal window, execute:
java -jar path-to-file/classquequerycreator.jar
Figure 5 shows the initial ClassQue Query Creator menu when the program is started. There will also be a second window labeled Classroom Query Preview which we will discuss later.
Each query has a type, a name and a prompt. The name is used to help you remember which query you are looking at. The prompt is the actual question.
Figure 5: The initial window of the query creator.
Most of the controls are on the menu bar at the top of the frame. Use File to load or save a file of queries. Use New Query to create a new query. Once queries have been created, use Previous Query and Next Query to move among them.
Use the Type combo box to choose the type of query.
For now, create a new query by pushing New Query and choose the Choice type which represents a multiple choice question. Type in a name and write your question in the Prompt field.
Figure 6 shows the main window after a name and prompt have been filled in for a Choice query. Some new HTML Edit and Choice items appear in the center section of the window.
Figure 6: The initial window with a choice query, name, and prompt.
The text you enter for the prompt is interpreted as HTML. The box shows the HTML source. When you push the Return key, that HTML tag <br/> is entered to start a new line. The resulting question as seen by the student is shown in the Classque Query Preview window.
Recall that normally HTML displays ignore extra spaces and all new lines in the input. When you are entering HTML, the HTML Edit menu appears, allowing you push a button to insert a line break, a space, or the special characters < and >.
A Choice query has a list of answers, similar to a multiple choice question. When a choice query is being edited, the Choice menu appears under the query name. Each time the New Choice button (to the right of the type combo box) is pushed, a new answer field is created.
Saving and loading query files
Use the File menu item to load or save files. The options are Load, Save, Import, and Save as Text. Choose the Save menu item. This will bring up a save file dialog and you can choose the name of the file for saving the queries. I like to name these files by the course number and lecture number they will be used in, but there is no restriction on how to name the files. Avoid using extensions that are reserved for other file formats such as .doc or .html. I usually use the .txt extension.You can load a file into the query creator by using the Load item from the File menu. This works in a similar way and brings up a load file dialog, allowing you to choose the name of the file previously created using the query creator. Note: Loading files appends queries to the currently loaded queries. This implies that if you load this file after saving it, you will have two copies of the queries in the query creator. Use the Actions -> Delete All menu items before loading a new file if you want to replace the queries currently in the query creator.
The Save as Text menu item from the File menu will save the queries in a file that can easily be read. This format, however, cannot be used by ClassQue and the ClassQue Query Creator cannot read files that were produced in this way. It is useful for printing out queries or for using a spell checker.
Creating Queries
A new query is added to the current queries in the creator as follows:
- Push the New Query button which is on the menu bar of the main window.
- Choose one of the query types using the Type combo box.
- Set the name of the query.
The name should be a short string that will remind you of which query it is. - Set the Prompt for the query.
(See the section on Editing Prompts and Choices for entering formatted text.) - If the type is Choice or Checkbox, select Choice rather than Prompt. If there are no choices this will create an empty choice. Additional choices can be created with the New button in the Choice menu. Use the Select buttons to choose which choice to edit.
- You can change the order of the choices by using the Move buttons of the Choice menu.
Editing Prompts and Choices
You can modify the contents of a prompt or choice field by for selecting it and then typing in the edit area.The text you type in a prompt or choice field is treated as HTML source. You should always look at the ClassQue Query Preview to see what the students will see. When editing these the HTML menu contains buttons for surrounding text with tt, pre and Color tags. First select the the text you wish to modify and the push one of these buttons. If nothing is selected when one of these buttons is pushed, an empty field will be created with the cursor between the start and end tags.
Editing Annotations
Annotations are not seen by the students during the class. They can be use used to insert notes or grading information for the reporting programs. The annotation area contains simple text (not HTML). Use the Return key on your keyboard to start a new line. You are not allowed to use tabs or back quote characters in an annotation field.Working with Surveys
Normally, when you send a query to the students, they only see the query that was most recently sent. They cannot work on another query until a new one is sent, and after that time they no longer have access to the previous query. A survey is a collections of queries. When a survey is sent to the students, they have access to all of the queries of that survey and can move among these queries. Similarly, the teacher can look at each of the queries in the current survey. This allows students to work at their own pace.A survey has a name and a collection of queries. You create a survey using the ClassQue Query Creator by making a query of type Survey Start. This type of query does not correspond to a question. It does not have a prompt, but does have a name. All queries after this one and until a Survey End query (or the end of the list) will be in the survey. A Survey End query is also created by selecting it in the Choice combo box. A Survey End query is just a place holder and has neither a prompt or a name.
You can easily move queries in and out of a survey by creating a Start Survey query and using the ClassQue All Queries window to move queries in or out of the survey. In the ClassQue All Queries window, queries that are in a survey are shown surrounded by a box with a border containing the name of the survey.
Figure 7 shows the ClassQue All Queries window for a file containing five ordinary queries and a survey containing five additional queries.
Figure 7: The All Queries window showing a survey.
Barriers
Three types of markers (called barriers) can inserted anywhere in a list of queries. These markers are created by making a new query and chooing one of the types Soft Barrier, Hard Barrier, and Teacher Barrier.Each of these restricts the way students can select questions from a survey. If a Hard Barrier is reached, students may not continue until all previous questions have been answered. Once passed, previous answers may not be changed. A Soft Barrier similarly does not allow progress until all previous questions have been answered, but students may still go back and modify answers. A Teacher Barrier prevents progress until the teacher releases the barrier.
Reviews
By default, all queries can be reviewed by students if the teacher allows student reviews. Reviewing of individual queries can be prohibited by unchecking the Reviewable box on the top right side of the main window. This only affects the ability of students to review this query and has no effect on teacher reviews.Grades
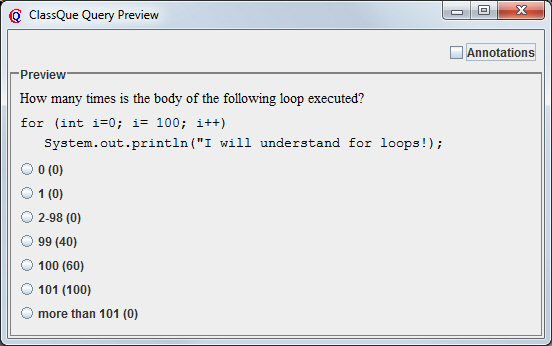
If the Grade Points field (below the Reviewable checkbox) in the main window contains a non-zero value, the corresponding query can be assigned a grade. The teacher can always assign a grade to an answer, but some types of queries can also be graded automatically and some can be graded by students.Choice and Checkbox queries cannot be graded by students. You can assign a grade for each possible answer once a non-zero value has been entered in the Grade Points field. Figure 8 shows the main window in such a case. The fourth choice is being editing and it has been assigned a grade of 40 using the Points field of the Choice menu items in the middle part of the window. The corresponding Preview Window shown in Figure 9 shows the point values of each answer in parentheses. These values are not shown to the students. Also, in the top part of the main menu, the point value of the choices appear in a comma-separated list.
Figure 8: Grades for a query of type Choice.
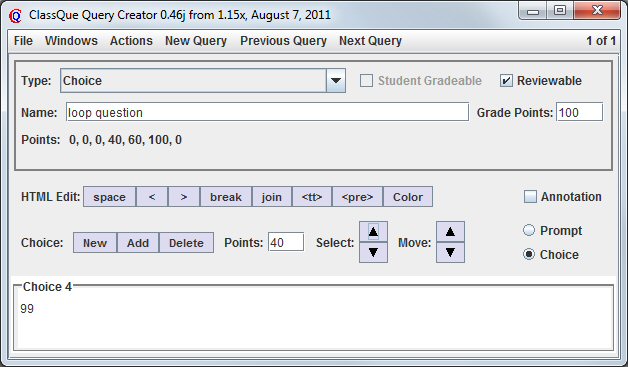
Figure 9: The Preview window corresponding to Figure 8.
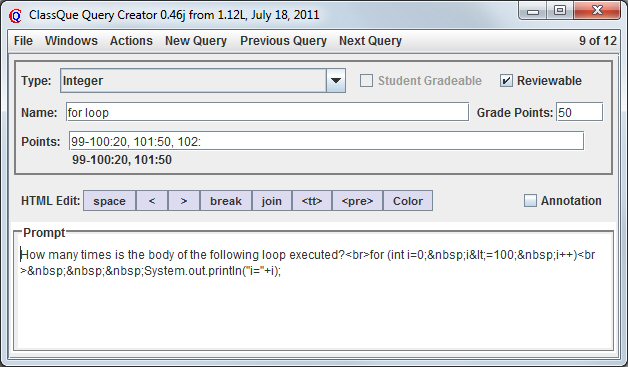
Integer queries cannot be graded by students. You can assign a point value associated with a given answer by using the format answer:grade. A comma-separated list of such values can be entered in the Points field that appears in the top section of the main window once a non-zero value is entered into the Grade Points field. This is shown in Figure 10. You can associate a grade with a range using the format low-high:grade. Either the low or high values can be omitted, making the range extend to minus or plus infinity. After editing, invalid entries are removed and overlapping ranges are combined. As you edit, you can see the resulting list below the edited field. In Figure 10, an incomplete entry appears in the editing field, but it will not show in the list below until it has been completed correctly.
Figure 10: The main window for an Ingteger query with a grade.
Freeform and Code types cannot be graded automatically. These can be assigned a grade by the teacher. If the Student Gradeable checkbox is selelected, as it is by default, students who review the answers to this query can assign a grade. If no teacher has assigned a grade to this answer, the average of all student grades assgned will be used.
Return to the main ClassQue page
