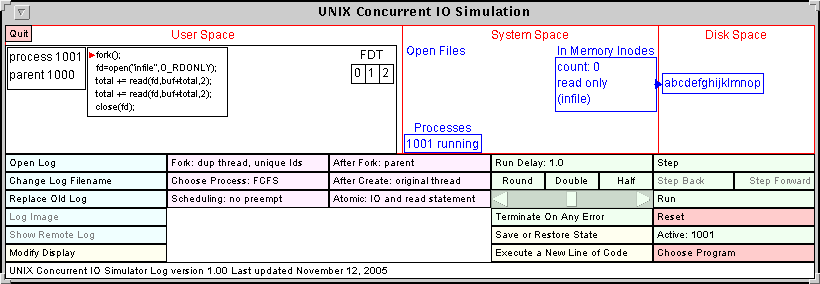
Figure 1: The main simulator window.
Although the program can handle threads, it can be used to illustrate standard process I/O by avoiding use of the various pthread instructions.
The simulator is a Java program that uses the JELI package. Many of the parts of the simulator use this standard interface.
System requirements:
User requirements:
If you are only interested in this simulator, you can download a zip file io.zip that contains all of the files that you need.
Running in a non-Windows environment:
If you installed the simulator by copying the files from a CD, the
scripts may not have the correct permissions to run. The convert
and runio files should be executable.
The ASCII files distributed with this distribution are in the Windows format
in which lines end in a carriage return followed by a line feed.
If you are running under UNIX, Linux, or Mac OSX, it
may be more convenient to have the carriage returns removed.
You can remove all of the carriage returns from these files by executing the
convert script.
If you do a custom installation, you can put the jar files anywhere you want. Modify the runio.bat (Windows) or runio (Unix, Linux, Mac OSX) file so that the JARDIR1 or JARDIR2 variables points to the location of the jar files.
If the simulator does not start, make sure you have the Java runtime
executables in your path. In a command window, execute:
java -version
and make sure this displays a version of at least 2.0.
Figure 1: The main simulator window.
The screen is divided into sections. The top part of the screen shows a pictorial representation of the computer system. The bottom part has a collection of clickable buttons and other controls that modify the simulator properties and run the simulation. The top part of the screen is divided into three sections. These sections, from left to right are the User Space which shows the processes and threads, the System Space which shows the system open file table, the in-memory inodes and the list of processes, and the Disk Space which shows the disk blocks.
The buttons and controls are arranged in 5 columns. The first column controls the logging features and the display. The second and third columns control the scheduling of processes and threads. The Fourth column controls the rate at which the program runs, save or restore the state of the simulator, and allows you to execute an instruction on the fly. The last column is for running the program.
In the last column, the step button will execute the next instruction. The Step Back and Step Forward buttons allow you to move through already executed parts of the program. The Run button will run the program until it completes or an error occurs. It will run at a rate controlled by the slider to the left of the run button. The delay between instructions is in seconds. The Reset button will reset and start the program from the beginning. Below this is the Active button which shows which process or thread has the CPU. Clicking on this button does a context switch. Lastly, the Choose Program button allows you to choose which program to run.
Figure 2 shows the simulator with a more complicated program after it has been executing for a while. There are now two processes, the first having 3 additional threads and the second having 2 additional threads. The User Space is divided into two regions, one for each process. For each process, the box on the far left shows the ID of the process and its parent, as well as the values of variables.
To the right of the variables is a box showing the program being executed. If the program has not yet completed, a triangular arrow indicates the next instruction to be executed (the program counter). The arrow is red if the process is in the CPU (one of the threads of process 1002). It is hollow if the process is suspended (either waiting on a join or blocked I/O) as in process 1001. All variables are assumed to be appropriately declared. The values of these variables are shown in the variables box once they have been initialized.
To the right of the program box are boxes showing the functions executed by the threads that have been created. One box appears for each thread function and represents one or more threads running that code. Thread IDs are represented by an ordered pair giving the process ID and a unique integer thread identifier. The thread identifiers are assigned in numerical order. In the upper left corner of each thread function box are the thread identifiers for the threads running this function. Each will have an arrow representing the program counter for that thread unless the thread has completed.
In Figure 2, the first process has three threads. It is suspended, waiting to join the thread with ID (1001,1). The first thread has thread identifier 1, is running the program firstThread and is about to execute the read instruction. The second thread is executing the same function but has finished. The other thread is executing the function secondThread. The thread with identifier 2 has completed (it does not have an arrow for the program counter) and the thread with identifier 3 is about to execute its close instruction. The vertical bar at the end of the program counter arrow indicates that this thread is detached.
On the right side of the User Space of each process is the file descriptor table (FDT) for that process. The first three entries corresponding to standard input, standard output, and standard error are shown on the first line of the FDT. Since the simulator is concerned with file I/O, the contents of these entries are not shown. Each of the other open file descriptors points to an entry in the system file table (SFT) in the System Space.
In Figure 2, the first process shows file descriptors 3 and 4 pointing to independent entries corresponding to reading from the file infile. The second process also has two open file descriptors other than 0, 1, or 2. File descriptor 3 is reading from infile and file descriptor 4 is writing to outfile.
Three items are shown in System Space, the System File Table, the list of active processes, and the files.
Each SFT entry shows the file being accessed, the count of the number of open file descriptors using this entry, and the current file offset.
To the right of the open files is the in-memory inodes. In this case there are two files. The file infile can only be read from. The file outfile can only be written to. All outfile files are empty when created. This file has had 5 bytes written to it by Thread 2 of the second process.
Under this is the list of active processes or threads, indicated by its ID (process ID or thread ID). The state of each process or thread is also given, Running, Ready, Joining, Waiting, or Zombie.
Lastly, the Disk Space shows the contents of the files.
You can easily try the simulator with the included programs. Figure 2 corresponds to Program 7. Use the Choose Program button in the lower right corner to pick one of these program and either step through it with the Step button or run it with the Run button. When the program is running, the Run button changes to Pause and the Reset button changes to Abort Run. When paused, the Pause button changes to Resume.
To exit the simulator, push the pink Quit button that is in the upper left corner of the the frame.
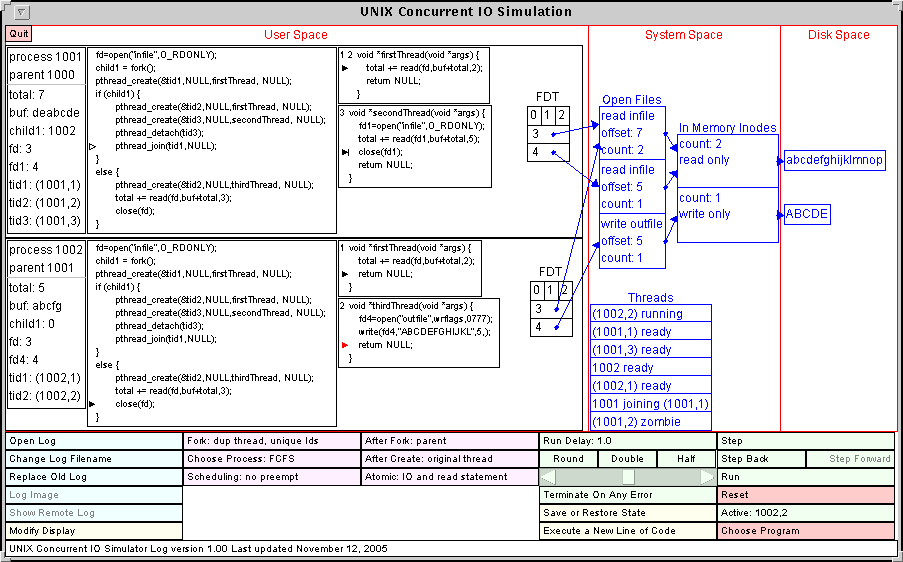
Figure 2: The main simulator window during execution of a program.
The default configuration file is called ioconfig. A copy of this file is included with the standard distribution. The configuration file contains lines consisting of a keyword followed by parameters. The keyword is not case sensitive. Two of the important keywords are program and thread. Each of these is followed by a single token giving the name of the file containing the code for the given program or thread. These files must exist in the same directory as the file ioconfig.
Each program has access to a number of variables that are assumed to be
correctly declared. No variables are initialized, and using the value
of an uninitialized variable is considered a fatal error. The simulator
terminates a run when a fatal error occurs. The available variables when
threads are not used are:
int totaln;
char bufn[LARGE_SIZE];
int childn;
int fdn;
The bufn are assumed to be arrays of arbitrarily large size
that can be copied into. The n
can be any non-negative integer, or can be omitted completely.
These allow such
variables as child0, child5, child123, child
or fd7.
Each program line has one of the following forms:
fdn = open("string",O_RDONLY);
totaln += read(fdm,bufn+totaln,p);
fdn = open("string",wrflags,0777);
fdn = open("string",wrflagst,0777);
fdn = open("string",wrflagsa,0777);
fdn = open("string",wrflagsta,0777);
write(fdn,"string",p);
close(fdn);
fork();
childn = fork();
if (childn) fork();
if (childn) childm = fork();
if (!childn) fork();
if (!childn) childm = fork();
childn = wait(NULL);
if (childn) {
if (!childn) {
else {
}
Here, string represents an arbitrary sequence of printing characters,
n and m are non-negative integers (0, 1, 2, etc.) and
p is a positive integer (1, 2, 3, etc.).
The last 4 instruction types allow different blocks of code to be executed by parent and child processes.
The open for write instructions use the following write flags that
allow opening use of the append and truncate flags:
int wrflags = O_WRONLY | O_CREAT;
int wrflagst = O_WRONLY | O_CREAT | O_TRUNC;
int wrflagsa = O_WRONLY | O_CREAT | O_APPEND;
int wrflagsta = O_WRONLY | O_CREAT | O_TRUNC | O_APPEND;
Some restrictions apply to how these are used. Blocks must be nested properly or the program will be rejected by the simulator. Files open for reading must have their names in an appropriate configuration line so the simulator knows the contents of these files. Files used for reading cannot also be used for writing.
The simulator does little checking on the syntax of the program file lines.
These lines are only checked so as to distinguish one type of instruction
from another. For example, only three of the above lines contain an open
brace, so the following are valid lines in a program file:
{
child2 {
{ !child4
and these are interpreted as:
else {
if (child2) {
if (!child4) {
In addition, the top button in the second column determines what is duplicated when a fork occurs. The POSIX thread library specifies that a fork only duplicates the currently running thread, not all of the thread of the process. This is the default for the simulator. The simulator can also be set so the when a fork occurs, the process and all of its threads are duplicated. This button also controls whether thread IDs are unique across processes. The POSIX standard leaves this to the implementation. If thread IDs are unique, then a join in a forked process can refer to a thread in another process. This is not allowed and the simulator considers this a fatal runtime error.
The second button in the second column determines how the next process is chosen when a context switch takes place. The possibilities are:
When a thread is created in the simulator, one of the tid variables is set to the ID of the created thread. The simulator displays these thread IDs as an ordered pair containing the process ID of the creating process and a integer thread identifier which is unique within the process. POSIX does not specify the format of a thread ID and in many systems it is just an integer. POSIX also leaves open the question of whether thread IDs are unique throughout the system (no two threads have the same thread ID) or whether they are just unique within a given process (no two threads of the same process have the same thread ID). Usually this does not make a difference since a process cannot reference (with detach or join) a thread of another process. The simulator displays thread IDs as if they are unique throughout the system because it makes it easier to see what is happening when a program is traced.
It is usually not a good idea to mix thread creation, fork and join as these may interact in unexpected ways. Suppose a process creates a thread and sets tid2 to the ID of the created thread. If the process then forks a child, the child has a copy of the variable tid2. What thread does this represent? In the POSIX standard, a fork only duplicates a single thread, the one that executed the fork. The child process does not have a thread corresponding to tid2. What would happen if the fork duplicated all of the threads of the parent process? The child would have a thread corresponding to tid2 in the parent. Would tid2 represent the thread in the parent or the child? The answer depends on whether thread IDs are unique across the system or just within the process. POSIX does not address this. The simulator allow you to experiment with each of these possibilities using the Fork: dup button at the top of the second column of buttons.
All of the instructions described above are available except for those with a condition, or the start and end block instructions. The instruction is executed by the currently running process or thread. You can change the active process or thread with the Active button which is in the last column.
If no configuration file is found, the simulator uses a default configuration along with corresponding program and thread files that are stored in the jar file containing the simulator code. The default configuration and files is the same as the configuration file provided with the simulator distribution.
In addition to the simple configuration described above, the configuration file can contain line affecting many aspects of the simulation, including how the scheduling is done. Also, any of the configuration lines may appear in a program file by preceding the line with a #. These lines are not displayed by the with the program in the box at the left of each process User Space, but change the operation of the simulator when the program is chosen. After of the configuration options only make sense when the simulator is started and these are ignore when they appear in a program.
The table below lists all of the configuration options.
| Keyword | Values | Meaning |
| General Parameters | ||
| user | anything | The name of the current user. This appears in the log file. |
| quiet | none | Turns off all sounds generated by the simulator. |
| directory | string | The directory containing the programs and threads. |
| fontsize | integer | The font size used for displaying everything but program code and button labels. |
| programfontsize | integer | The font size used for displaying program code. |
| Programs, Threads, and Files | ||
| program | filename | The name a file containing a program. The filename also serves as the name of the program. There can be any number of these configuration lines. |
| thread | filename | The name of a file containing a thread function. This name is used only for reading in the thread function. The name of the thread is contained in the file itself. There can be any number of these configuration lines. |
| file | two strings | The first string is the name of an input file and the second is the contents of the file. This file is used internally to the program and is not related to anything stored on the disk. Thread can be any number of these configuration lines. |
| Scheduling and Running Parameters | ||
| rundelay | an floating point number | The number of seconds to delay between instructions when the Run button is used to run a program. |
| IOAtomic | none | IO instructions are atomic. |
| IONotAtomic | none | IO instructions are atomic. |
| AtomicInstruction | specific token | Allowable tokens are true and false. If set and IO is atomic, so is setting of total in read instruction. |
| SchedulingNoPreempt | none | Scheduling is not preemptive. |
| SchedulingRR | an integer | Scheduling is done using round robin with the given quantum. The quantum represents the number of instructions that can be executed before a context switch is forced. |
| SchedulingRandom | a probability | A context switch occurs after each instruction with the given probability. Anther ready process is chosen at random. |
| forkaction | specific token | The allowable tokens are all and thread. If all, a fork duplicates the forking process and all of its threads. If thread, only the thread executing the fork is duplicated, as in the POSIX standard. |
| uniqueid | specific token | The allowable tokens are true and false. If true, thread IDs are unique across processes. If false, thread IDs are unique only within a process. |
| choose | specific token | The allowable tokens are FCFS, next, and random. This determines how the next process is chosen when a context switch occurs due to a process being blocked or terminated. If FCFS, the process that arrived in the ready queue first is chosen. If next, processes are chosen by their process or thread ID. If random one of the ready processes is chosen at random. |
| afterfork | specific token | The allowable tokens are parent, child, either, and random. This determines which process executes after a fork. If parent the parent does not lose the CPU because of the fork. If child, the child process always executes after the fork. If either, either the parent or the child executes after the fork, with one chosen at random. If random a random process or thread is chosen after the fork. |
| aftercreate | specific token | The allowable tokens are original, new, either, and random. This determines which process executes after a pthread_create. If original the original thread does not lose the CPU because of the pthread_create. If new, the newly created thread always executes after the pthread_create. If either, either the original thread or the newly created one executes after the pthread_create, with one chosen at random. If random a random process or thread is chosen after the pthread_create. |
| Logging Parameters | ||
| logfile | a filename | The name of the log file. The extension .html will be appended to this. The default log file is logfile.html. |
| logdir | a directory path | If given, this is the directory for storing the log file. If not given, the log file is stored in the current directory. |
| uniquefilename | an integer | If given, use a unique file name each time a log file is opened. Do this by appending an integer with the given number of digits to the filename. |
| imagename | a string | The base filename used for logged images. An integer is appended to the name to make the image files unique. |
| port | an integer | If this value is greater than zero, remote logging will be used with this port. The default is 0. |
Initially, these buttons are used to control the logging functions before the log file is open or after it is closed. The first button opens the log. When the log file is successfully opened most of the buttons change their function to control the log functions appropriate when logging is in progress.
While the log is closed, the second button toggles between the modes Replace Old Log and Append to Log. In the former case, opening the log file overwrites any file with the same name that already exists. In the latter case, the new log is appended to the old one. The third button can be used to change the name and directory used for storing the log file. Pushing this button pops up a dialogue box in which the user can change the directory and log file names. The names of the files for storing the graph image files created by the simulator can also be changed.
The Show Remote Log button can be used to pop up a browser window containing the log file generated when the log is stored remotely.
After the log is successfully opened, the Open Log button changes to Close Log, the second button changes to Log Comment, and the third button changes to Stop Log.
Close Log terminates logging and closes the log file. Stop Log temporarily stops adding information to the log file but keeps the log file open. When pushed, this button changes to Start Log which resumes the logging.
The Log Comment button pops up a window which allows the user to enter comments into the log file.
The Log Image button puts a copy of the currently displayed diagram in the log file.
The Save or Restore State button can be use to save or restore the state of the simulator in a file. A restored state contains only the current state of the simulator so you cannot step back from a saved state.
Most of the widgets can be dragged within their display area. Process widgets: the variable list, the program code, and the file descriptor table must stay in the area reserved for that process in the User Space. The system widgets: the system file table, the list of processes and the in-memory inode list may stay in the System Space. The file contents widgets must stay in the Disk Space. The boundaries between these spaces and between the processes can also be modified by dragging them.
Each of the widgets has a standard position.
The Modify Display button at the bottom of the first column of buttons allows for the modification of the display in several ways. Clicking on this button brings up a menu with 5 options.
Example 1: two independent processes reading
Program 1 looks like this:
fork();
fd0 = open("infile",O_RDONLY);
total += read(fd0,buf+total,2);
total += read(fd0,buf+total,2);
close(fd0);
The process forks a child, each process opens the file and reads 4 bytes from
the file. Each time open is called, a new SFT entry is created.
Since the two processes are using different SFT entries and
therefore different file offsets, the two processes each read the first 6 bytes
of the file, independent of how the processes are scheduled.
Example 2: two processes that share the file offset
Program 2 looks like this:
fd0 = open("infile",O_RDONLY);
fork();
total += read(fd0,buf+total,2);
total += read(fd0,buf+total,2);
close(fd0);
It is identical to Program 1, except that the open occurs before the fork.
The open function is called only once, so only one SFT entry is created.
The count in the SFT entry is initially 1, indicating that only one file
descriptor is accessing this entry. After the fork, the count in this
entry becomes 2.
The two processes share the same SFT
entry, and therefore share the file offset. When one process reads two
bytes, the file offset is 2. Whichever process reads next, that process
will read the next two bytes of the file.
If the parent completed execution before the child starts reading, the
parent will get abcd and the child will get efgh.
If the parent loses the CPU after the first read and the child executes
both of its reads before the parent gets the CPU again, the parent will
get abgh and the child will get cdef. If the reads are
atomic, one process will get abcd, abef or abgh
and the other process gets the other 4 bytes in alphabetical order.
You can experiment with this by changing the scheduling to round robin
with a quantum of 3, or using random scheduling. You could also single step
through the program and change the running process at different points in
the execution.
When the first close is called (either by the parent or child) the count stored in the SFT entry is decremented to 1. The second call to close decrements the count to 0 and the entry is removed.
The situation is move complicated if (as according the the POSIX specification), reads do not have to be atomic. In this case, a process can lose the CPU between reading the first and second byte of the 2-bytes read instructions. The possibilities are more numerous. There are 20 possibilities for the process that gets the first byte: abcd, abce, abcf, abcg, abde, etc. Each process will read 4 bytes (assuming that each read does return 2) in alphabetical order and the other process will read the other 4 bytes. You can experiment with this by setting the I/O to be not atomic.
On real systems, these other possibilities will occur rarely (if at all), but programs but work correctly if they do occur.
Example 3: Writes with independent processes
Program 3 looks like this:
child1=fork();
fd0 = open("outfile",wrflags,0777);
if (child1) {
write(fd0,"ab",2);
write(fd0,"cd",2);
}
else {
write(fd0,"AB",2);
write(fd0,"CD",2);
}
close(fd0);
The parent and child each open the file and write 4 bytes to the file,
the parent writing abcd and the child writing ABCD.
The wrflags variable is defined as O_WRONLY | O_CREAT.
Since the processes use different SFT entries, the file offsets are independent.
The first write of each process writes to the start of the file. If the
parent completes writing before the child starts, the child will overwrite the
4 bytes written by the parent and the file will contain ABCD. If the
writing is interleaved, a number of possibilities may occur including
ABcd. If writes are not performed atomically, any combination of
upper and lower case abcd may occur in the file, including AbCd.
Example 4: Writes that share a file offset
Program 4 looks like this:
fd0 = open("outfile",wrflags,0777);
child1=fork();
if (child1) {
write(fd0,"ab",2);
write(fd0,"cd",2);
}
else {
write(fd0,"AB",2);
write(fd0,"CD",2);
}
close(fd0);
Since the open occurs before the fork, the processes share a SFT entry
and therefore share the file offset. Each process writes to the end of the
file and the file should contain 8 bytes when both processes complete.
There are many possibilities including abABCDcd. If the writes are
performed atomically, there are 6 possibilities. If writes are not performed
atomically, there are many more possibilities. The POSIX standard states that
the file offset is updated when the write returns but does not indicate
the state of the offset if a process loses the CPU while performing a write.
The simulator assumes that the offset is updated with each byte written.
In this case the possibilities include aABbcCdD and abcABCDd.
The bytes abcd (in that order) can be arbitrarily interleaved with
ABCD (in that order).
Example 3a: Opening with the append flag
Program 3t is identical to Program 3, except that the open is now:
fd0 = open("outfile",wrflagsa,0777);
where wrflagst is O_WRONLY | O_CREAT | O_APPEND.
When a file is opened with the O_APPEND flag set, the file offset
is set the the end of the file before a write takes place. In addition,
no other changes can occur to the file between the changing of the file
offset and the completion of the write operation. This essentially
makes the writing atomic. The POSIX standard does not indicate how this is
implemented. In the simulator, a write to a file with the append flags set
locks the file until the operation is complete. The process may lose the CPU
in the middle of a write (if I/O is set to not atomic in the simulator) but
another process (or thread) loses the CPU if it attempts a write operation
on this file before the first write completes. In this case even when
writes are not atomic, Program 3a behaves as if they are.
Example 3ta: Opening with append and truncate flags.
Program 3ta is identical to Program 3 and Program 3a except that the open is
now:
fd0 = open("outfile",wrflagsta,0777);
where wrflagst is O_WRONLY | O_CREAT | O_TRUNC | O_APPEND.
The O_TRUNC causes the file to be truncated to 0 length when it
is opened. Any bytes written to the file by the other process are discarded
when the open is executed. It is possible for the file to contain fewer than
8 bytes when both processes are complete. For example, if the parent finishes
its first write and then the child starts and completes execution,
the final contents of the file will be ABCDcd.
Things to try with IO atomic:
Example 6: Reading from threads, non-atomic I/O
Program 5 can behave in an unexpected manner if the instructions are not
executed atomicly. Program 6 is the same as Program 5 except that the read
in the main program is repeated. The main program looks like this:
fd1 = open("infile",O_RDONLY,0777);
pthread_create(&tid1,NULL,firstThread,NULL);
total+=read(fd1,buf+total,2);
total+=read(fd1,buf+total,2);
Set the IO to be not atomic and step through Program 6 as follows.
Explanation: Remember that when two threads (in this case the main thread and the created one) share variables, use of these variables form critical sections that should be protected with synchronization constructs. The simulator illustrates what happens when you do not protect critical sections.
In the following explanation, we assume that the file offset is updated with each partial read. The POSIX standard does not address the issue of whether the offset is adjust for each read or only when the read is complete.