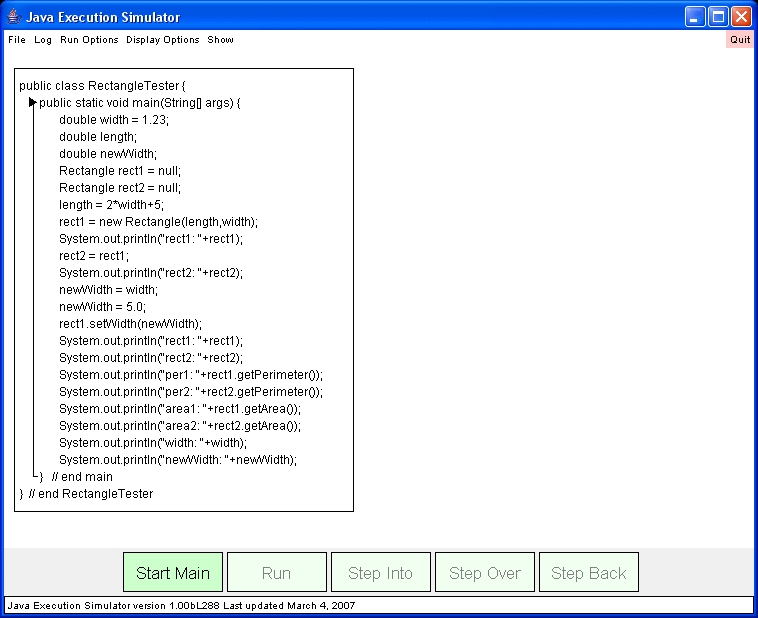
Figure 1: The main simulator window.
The simulator allows you to dynamically trace through various user-written
Java programs.
The main use of the simulator is to demonstrate the following aspects of
Java program execution:
The best way to see what the simulator can do is to run the example
programs that are described in the
SIGCSE paper.
If you can't wait, here
is a description of how to run the examples.
System requirements:
User requirements:
Running in a non-Microsoft environment:
If you installed the simulator by copying the files from a CD, the
scripts may not have the correct permissions to run. The convert
and runjs files should be executable.
The ASCII files distributed with this distribution are in the Windows format
in which lines end in a carriage return followed by a line feed.
If you are running under UNIX, Linux, or Mac OSX, it
may be more convenient to have the carriage returns removed.
You can remove all of the carriage returns from these files by executing the
convert script.
If you do a custom installation, you can put the jar files anywhere you want. Modify the runjs.bat (Windows) or runjs (Unix, Linux, Mac OSX) file so that the JARDIR1 or JARDIR2 variable points to the location of the jar files.
If the simulator does not start, make sure you have the Java runtime
executables in your path. In a command window, execute:
java -version
and make sure this displays a version 1.4.2 or later.
An additional 7 examples are available in the examples directory.
These can all be run on a display with a standard VGA resoulution of
1024 by 768.
They can be run from the command line be specifying one of the following:
runjs examples/counter
runjs examples/inheritance
runjs examples/objectassign
runjs examples/primarray
runjs examples/primarraycompare
runjs examples/primassign
runjs examples/sheep
When the simulator is started in the default configuration, the main simulator window looks like the one in Figure 1. Push the StartMain button to start the simulator. Then push the Step Into button a few times. Each time it is pushed one step of the program is executed. A line of code may take several steps to perform. Figure 2 shows the simulator after a few steps have been executed.
Figure 1: The main simulator window.
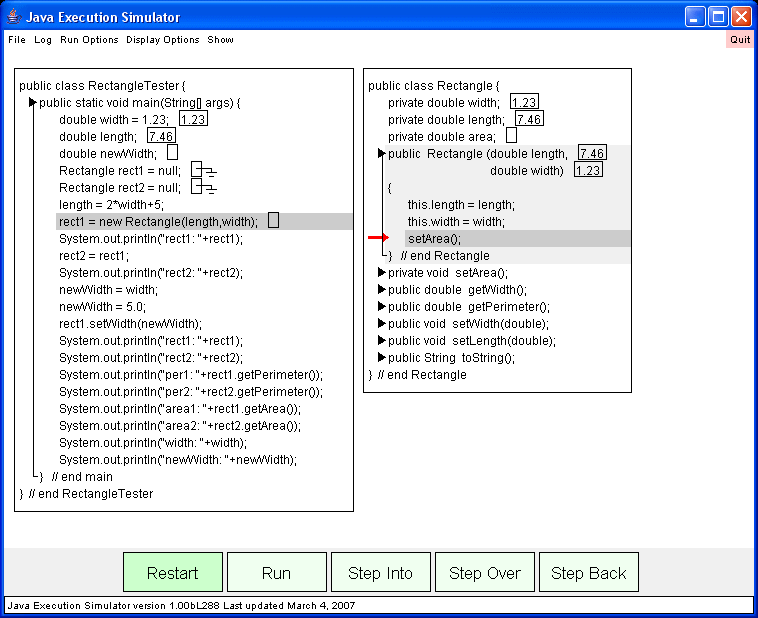
Figure 2: The main simulator window after a few steps of the program have been executed.
The red arrow shown in Figure 2 pointing to setArea(): shows which line will be executed next. The light gray background in the SimpleRectangle constructor indicates the block that contains this line of code. The line being executed has a dark background. The dark gray background of the line in main indicates that this line has not finished execution. The constructor will return to this point when it finishes.
The SimpleRectangle class in Figure 2 has 5 subblocks corresponding to the constructor and 4 other methods in the class. Each of these has a solid black triangle pointing to its start. Two of the blocks in SimpleRectangle have been expanded to show the code. Blocks are automatically expanded when they are entered. They stay expanded until the block has finished executing. You can manually expand or contract a block that is not executing by clicking on the block triangle at the start of the block.
A box appears after each declared variable that is active. Primitive values that have not been initialized have the box blank. Uninitialized reference variables and those initialized to null are shown with the ground symbol. The boxes of variables of primitive type contain the current value of the variable (shown using two decimal places for doubles). The values of reference variables are shown with an arrow pointing to the corresponding object as shown in Figure 3.
When data is to be moved, a thin red arrow points from the source to the destination. This is shown in Figure 3. The simulator can animate the movement of this data. See the Display Options menu item.
The default configuration file is jsconfig but you can use any
other file by including it in the command line.
If the given configuration file specification contains a directory, then
that directory will be the base directory for loading class files.
The configuration file consists of a number of lines, each contains a keyword
and possibly an argument. The supported keywords are described below:
| Keyword | Arguments | Meaning |
| user | anything | The name of the current user. This appears in the log file. |
| directory | filename | The name of the directory containing the class files. |
| program | filename | The name of the file containing the main class. |
| class | filename | The name of a file
containing a class definition. There may be many instances of this keyword. |
| logdir | filename | The name of the directory that will contain the log file. |
| logfile | filename | The name of the
log file. If uniquefilename is used, a number will be appended to make the name unique. The extension .html will always be appended. The default is logfile. |
| imagename | filename | The name of the file containing the images generated for the log file. The default is gifimage. |
| uniquefilename | an integer | If given, log files created are always unique with the filename generated by appending an integer with the given number of digits. |
| port | an integer | If given, an attempt will be made to store the log file on a remote machine. This is only appropriate if the simulator is loaded from an applet on a remote machine and that remote machine has the appropriate server running. |
| quiet | none | If present, the simulator does not
generate any sounds. This is the default and the only sounds supported by the simulator are key clicks. |
| noquiet | none | If present, the simulator generates a click each time a key is pushed. |
| digits | an integer | If given, this is the number of decimal places used when displaying double values. The default is 2. |
| fontsize | an integer | If given, this is the size of the font used by the simulator to display programs. |
| width | an integer | The initial width in pixels of the simulator window. |
| height | an integer | The initial height in pixels of the simulator window. |
| animate | on or off or fast or slow | on turns on animation of data movement, off turns it off (the default). fast or slow set the animation speed. |
| animateexpand | on or off or fast or slow | on turns on animation of block expansion, off turns it off (the default). fast or slow set the speed of block expansion. |
| show output | none | Start the simulator with the output window displayed. The default is to not display the output window. |
| commentary | filename | Use the contents of this file to modify the commentary. |
| show commentary | none | Start the simulator with the commentary displayed. The default is to not display the commentary. |
| externalcommentary | true or false | If true, use a frame to display the commentary. If false (the default) display the commentary under the main program. |
| commentaryfonsize | an integer | Use this as the size of the font when the commentary is displayed in a frame. |
| commentarylines | an integer | Use this as the number of lines in the commentary frame. |
| commentarycolumns | an integer | Use this as the number of columns in the commentary frame. |
| commentarylowerright | none | Puts the commentary box in the lower right corner. |
| outputfonsize | an integer | Use this as the size of the font in the output frame. |
| outputlines | an integer | Use this as the number of lines in the output frame. |
| outputcolumns | an integer | Use this as the number of columns in the output frame. |
| outputfirst | none | Displays the output box before the commentary box. |
| outputlowerright | none | Puts the output box in the lower right corner. |
| verticalobjects | none | By default, each new object is placed in a horizontal row. If this is used, they are placed in a vertical column. |
The simulator allows you to create a log file in HTML format. The only things you can put in the log file are copies of the simulator window, the output generated by the simulator, and a user-generated comment. Logging is controlled by the Menu Options.
The 5 large buttons at the bottom of the simulator window control the running of the simulator.
| Button | Description |
| Start Main | This button starts the simulator and sets the program counter to point to the first executable instruction in main. None of the other buttons are active until the simulator has been started. When pressed, this button changes to Restart which allows you to start over from the beginning. |
| Run | Runs the simulator until it reaches the end of main or until a breakpoint is reached. You can set a breakpoint by shift-clicking the mouse on an executable line. Shift-clicking again clears the breakpoint. When a breakpoint is set at a line, a small red dot appears at the start of that line. When breakpoints are set, this button splits into 2 buttons, one labeled Run Fast and the other Run Slow. The slow speed is the same as the normal running speed. The faster speed allows you to more quickly reach a breakpoint. |
| Step Into | This executes one step of the simulator. Many lines of code execute in several steps. For example, a simple assignment is executed in two steps. First the right side is evaluated and then the value is stored in the variable referenced on the right side. |
| Step Over | This executes until the next line of the same method. It is equivalent to setting a breakpoint at the next line and pushing Run Fast. |
| Step Back | Backs up one (Step Into) step. |
There are 5 menu options at the top left of the simulator window and a pink Quit button on the top right. Each of the ones on the left activates a drop-down menu when the mouse is moved over the button (or when the button is clicked in older versions of Java).
| Menu Option | Items and Description | ||||||||||||||
| File | The only option is to quit the simulator. This reproduces the function of the Quit button. | ||||||||||||||
| Log | This has the following options that control the logging functions of the
simulator.
| ||||||||||||||
| Run Options | These menu items control the speed at which the simulator is run.
The speed values can be set with the speed control.
See the section on Running Speed.
| ||||||||||||||
| Display Options | These menu items control how the display looks.
| ||||||||||||||
| Show | These menu options pop up additional display information.
|
Figure x shows how the simulator displays the inheritance relationship. The simulator supports inheritance through extends but does not support interfaces. The representation used for inheritance and for multiple objects of the same class is shown in Figure x. It gives a conceptual representation suitable for a beginning programming course. The values of temporary variables are shown with the object, rather than trying to introduce the concepts of an activation record and stack which are beyond the scope of understanding for beginning students. The representation used is possible only because all simulator programs run with a single thread.
If the Show Commentary menu item is activated, a commentary window will be displayed. Be default, this window is below the main program. Alternatively, the configuration file can indicate that the commentary appears in a separate frame.
Be default, the commentary gives a short description of what the simulator will do next based on the type of the line of code to be executed (assignment, method call, return, etc.). This can be supplemented by specifying a commentary file in the configuration file.
The commentary file is a text file with a very specific format. It consists of records, each starting with a number followed by an optional plus or minus sign followed by a colon. The rest of the record is the commentary text for the program step corresponding to the initial number given in the record. The simulator keeps track of how many steps have been performed, one step corresponding to a push of the Step Into button.
If no plus or minus sign appears after the step number, the given text replaces the default commentary for that step. A plus sign puts this commentary after the default commentary and a minus sign puts it before the default commentary.
Several examples of commentary files are included in the examples directory.
The simulator comes with the ability to create the required input files from a collection of Java source files. By starting the simulator using the runauto script or the runauto.bat batch file, the simulator will find all of the Java programs in a given directory, convert them to a format appropriate for the simulator, create a configuration file, store all of these in a new directory, and start the simulator using these files.
You can either specify the name of the source and destination directories, or have the program prompt you for them when it starts running. See the section Startup Options. The basic scenario has you running a real program, say using a development system, and you want to run the simulator using this program. You start the simulator with runauto, you give it the name if the directory containing all of the source files and the name of a temporary directory to contain the resulting simulator files, and it does the rest.
All of the files with the .java extension in the given directory will be used and the program will find the one containing the main method. Due to the restrictions on the type of programs that the simulator can handle, there are a number of restrictions on the source files.
Normal Mode Options
| Option | Parameters | Description |
| -jversion | none | Just display a version message and exit. |
| -jfontsize | integer | Set the default font size for the buttons and program. |
| -jfontfamily | string | Set the font family for the fonts used by the simulator. |
Auto Mode Options
| Option | Parameters | Description |
| -r | none | Start the simulator after creating the contents of the directory used by the simulator. If this is not present, the files in this directory are created, but the simulator is not started. |
| -s | directoryname | If present, this parameter will be used as the source directory. Otherwise you will be prompted for the source directory. |
| -d | directoryname | If present, this parameter will be used as the destination directory. Otherwise you will be prompted for the destination directory. |
Objects can be dragged around within the simulator window by clicking inside the object and moving the mouse while the button is held down. The simulator does not distinguish between the different mouse buttons. By default, the simulator will try to place the objects in appropriate positions, but when the diagram contains many arrows, manual placement might be necessary to achieve the appropriate effect.
Static Variables and Methods
Static variables may be declared. The simulator represents the static variables for each class with a box containing the names and values of the variables.
Static methods are shown with each instance of the object. The simulator does not treat static methods in a special way other than allowing you to reference them with the name of the class. If you try to call a non-static method or reference an instance variable from a static method, the results are not determined and it will probably crash the simulator. This is consistent with the requirement that all programs run by the simulator must be correct and only use features supported by the simulator.
Arrays
The simulator supports one-dimensional arrays of doubles and objects. An array is treated like an object and appears in a box with an indexed list of values.
Polymorphism
The simulator allows a class to have methods of the same name as long as the parameter lists has different types.
this and super
The simulator allows you to use this to reference instance variables when a parameter has the same name. You can use super to reference something in the super class.
Subblocks
Methods can have nested subblocks each with their local variable declarations. The variables in any block must be declared before any other executable statements in the block.
Output
The simulator supports System.out.println and System.out.print in a limited way. String variables are not supported, but string literals may appear in the argument of one of these methods. Display the Output Window to show the output. See the Show menu options. The argument to System.out.println or System.out.print consists for string literals and variables joined with a plus sign. The simulator does not support loops, but you can print the contents of and array by referencing the array as an argument to one of these methods.
The Speed Control has nine sliders in groups of three that control the running speed of the program.
The first set of sliders are Run Delay, Run Slow Delay, and Run Fast Delay. Each of these is measured in seconds and represents the number of seconds that simulator pauses after each step. The first of these, Run Delay, shows the delay currently being used if the program is running. Adjusting this slider while the program is running will change the rate at which the program runs. When the normal Run button, is pushed, either the Run Slow Delay (the default) or the Run Fast Delay is copied into the Run Delay depending on whether the normal running speed has been set to slow or fast. See the Run Options menu for setting the speed to slow or fast. When you push the Run Slow button, the Run Slow Delay is copied into the Run Delay so the program runs slowly. When you push the Run Fast button, the Run Fast Delay is copied into the Run Delay. The Run Fast Delay is also used when the Step Over button is pushed. Modifying the Run Slow Delay or Run Fast Delay slider will not have an immediate effect if the program is already running.
The second set of sliders are Animate Time, Animate Slow Time, and Animate Fast Time. These refer to the total time in seconds used to animate the moving of data. The first of these is used whenever animation of moving data is to be used. You can set this to either the Animate Slow Time or Animate Fast Time with the Run Options menu item. Animation of data movement can be turned on or off with a Display Options menu item.
The third set of sliders are Expand Pixels Per Second plus a slow and fast version of this. The value represents the rate at which methods are expanded when the are entered. The first of these is what will be used when expand animation is turned on. It can be turned on with a Display Options menu item. You can change the speed to slow or fast with a Run Options menu item.