This simulator is a single program that shows a teacher window and a class of eight students, three of whom have signed in. You can start the simulator from the included classquesimulation.jar file or from the web by accessing the following web page:
/classque/run/simulation.html
If all goes well, starting the simulator this will bring up four windows, a teacher and three students.
Response Display Formats
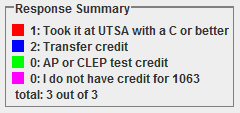
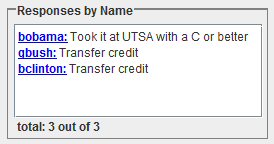
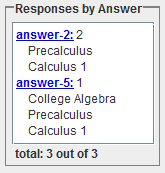
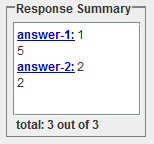
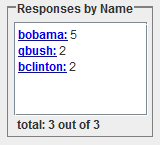
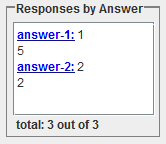
In the main teacher (or assistant) window, the menu Display -> Responses has three options: Summary, By Name, and By Answer.Figure 1 shows the results for the three types of response display for Choice, Checkbox and Integer queries.
Figure 1: The three types of display for Choice, Checkbox, and Integer queries.
| Display Response Type | |||
| Query Type | Summary | By Name | By Answer |
| Choice |
|
|
 |
| Checkbox |

|
|
 |
| Integer |
|
|
 |
The Summary Display
- Each answer is listed with the number of students that gave that answer.
- For Choice and Checkbox queries, all possible answers are shown.
- For Integer queries, only those values that at least one student has given are shown.
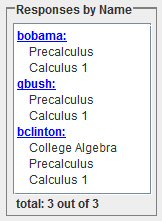
The By Name Display
- Each student that answered the query is shown along with the answer given.
- For Checkbox queries, multiple answer can be chosen by a student and all chosen answer are listed.
- If the seating panel is hidden (Display -> Queries and Shares -> Queries Only), the student names are replaced by numbers to anonymize the answers. The number represents the order in which the answers were submitted. This display is ideal for showing to the class.
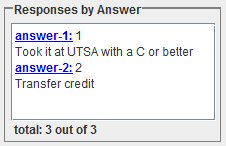
The By Answer Display
- Results are listed by answer.
- For Choice queries, the possible answers are the choices given and are numbered in the order they are listed, the first being answer-1, the second being answer-2, etc. This is followed by the number of students who have given that answer. Under this is the text of the answer. Only answers actually given by students are shown.
- For Checkbox queries, an answer is a subset of the choices provided. The first set actually chosen by a student is labeled answer-1, the second is labeled answer-2, etc. Since boxes can be checked or unchecked, many possible sets are temporary, but are still given answer numbers. Only those sets that correspond to current student answers are shown.
- For Integer queries, the display is the same as for the Summary display.
Except for Choice and Checkbox summaries, the student name or the answer is displayed as a link.
Click on that link will turn on or off the display of reviews of that answer.
For freeform and code types of queries, these all do the same thing. A list of students is given, each with that student's answer, similar to the Name response type.
Reviews
Once a student gives an answer (referred to as a response) to a query, that response may be reviewed by one or more teachers, assistants, or other students.In all but the Summary display for Choice and Checkbox, the reviews for a given response can be displayed by clicking on the name or answer link. This toggles the display of the reviews for that response. Alternatively, the all reviews can be displayed in these modes by using:
Display -> Review -> Show Reviews
and turned off with
Display -> Review -> Hide Reviews
Reviews are displayed with the same formatting they were entered in. Lines too long for the window in which they are displayed will be truncated. You can force these reviews to wrap using
Display -> Review -> Wrap Reviews
or turn off the wrapping of reviews with
Display -> Review -> No Wrap Reviews
Teacher Reviews
A teacher or assistant can review a response in several ways.When responses to a query are being shown (except for Summary display for Choice and Checkbox) an additional Review link can be shown with each response. The Review link is turned on with
Display -> Review -> Show Review Link
and turned off with
Display -> Review -> Hide Review Link
Clicking on the Review link will bring up a review window for that
response.
A review window shows the question and answer being reviewed. Type your review in the box labeled Comment.
When done, push the Send button.
You can show quick review links with
Display -> Review -> Show Correction Link
This will show two additional links in the response window labeled
Correct and Incorrect.Clicking on one of these creates a corresponding one-word review.
For Choice, Checkbox, and Integer queries, a review is associated with an answer, not with a student.
When a review is generated for one of these, the review is attached to the responses of all students that gave that answer.
Student Reviews
A teacher can allow students to see their reviews with
Student Options -> Review -> Allow See
This causes a review area to appear below the student response.
Pushing the Refresh Reviews button shows all of the reviews of
the student's current answer.
A teacher can allow students to generate reviews for other student's answers by using
Student Options -> Review -> Allow Create
This causes a Review tab to appear on the student window.
Activating this tab allows students to request
to review answers of other students to the current query.
Reviews are anonymous from the student's point of view.
Students do not see whose answer they are reviewing and cannot see
which students wrote reviews for their answers.Reviews generated by the teacher or assistant are marked accordingly so student and distinguish these from student reviews.
Shares
A share consists of a common area in which a group of students can enter text, along with a chat area.- A share can have any number of members.
- The members can be students or teachers.
- A share has an owner, usually the creator of the share.
- The owner (or a teacher) can write to the share at any time.
- Others must request write permission.
Figure 2: A student share window.
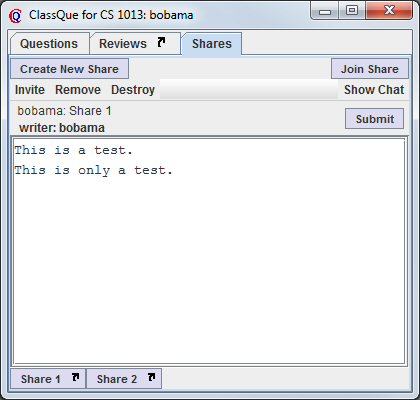
Student Created Shares
A teacher can allow students to create shares using
Student Options -> Share -> Allow Create
This gives the students a Create New Share button,
as shown in Figure 2.
When a share is created, it is given a name at the time of creation.
Each share must have a unique owner-name combination.
Students need to be invited before they can join a share. The owner of the share (or a teacher) may invite others to join the share. Students can invite users to join the share using the Invite menu option of the share. This brings up a list of checkboxes, one for each student. After students have been invited they can join the share using the Join Share button on their Shares tab. This button appears if a teacher has done:
Student Options -> Share -> Allow Join
The Join Share button brings up a list of shares that the student has
been invited to.
Each share is references by the share owner and the share name.The student owner of a share can remove student users or destroy the share.
A teacher can join any share (without invitation) using:
Windows -> Share -> Join Share
This will bring up a list of all shares that the teacher does not currently
belong to.A teacher share window is similar to the student share tab except that it has an Options menu item instead of Invite and Remove.
The options are:
- Remove Frame: The teacher's window for this share is destroyed and the teacher is no longer a member of this share. The teacher can rejoin the share at a later time.
- Remove Users: Shows a list of current users of this share and allows the teacher to selectively remove some of them.
- Remove All Users: Removes all student users from the share, including the owner.
- Change Owner: Allows the teacher to select a different owner from the current users of this share.
- Invite Users: Shows a list of students who are not currently users or invited, and allows the teacher to invite them.
- Add Users: Similar to invite, but forces these students to join the share.
- Change Title: Change the title of the share.
Using Shares
The owner or a teacher can write in the main share window at any time. All users see the same contents of this window as changes are made. The share frame shows the owner and the name of the share below the menu. Below this is the current writer of the share. Only one user can write at a time.A student user who is not the owner, must push the Request Write menu item before writing. This changes the menu item to End Write which the student can select when done writing. At any time the owner (or a teacher) can begin writing and lock out other users until they request write again. At any time a student user can push the Submit button to make a permanent copy of the current contents of the share window in the log file. A teacher user has a similar button labeled Log.
Shares have a chat feature. Use the Show Chat menu item to show a chat window below the main window. On the teacher share, the chat window replaces the share window. For the students, the chat window appears next common share area. The chat window has two parts, one for entering text, and one for showing a history of all text entered. After typing in the chat window, push the Send button to send the contents to all users of the share. Each entry is labeled with the name of the user that entered the text.
When the chat area is show, the share frame has three parts: the main share window, the chat entry area, and the chat history area. You can change the relative size of these by dragging the boundaries with the mouse.
Teacher Created Shares
A teacher can create a share using
Windows -> Share -> Create New Share
This creates a share with the teacher as the owner.
The teacher can then invite or add users to the share.The teacher can use
Windows -> Share -> Combine Shares
to combine all of the shares that the teacher belongs to into a single
frame.
This frame has two additional menu items: Join and Layout.
The Join menu item lists all of the shares that the teacher does not
belong to and allows the teacher to join these and add them to the combined
share frame.
The Layout menu item allows for selecting the number of columns of
shares shown.
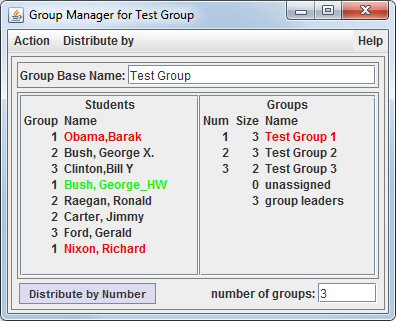
The Group Manager
The group manager allows a teacher to divide the class into groups, each group having its own share.Figure 3 shows two views of a group manager frame created with
Windows -> Share -> Group Manager
The right side of each frame shows the groups.
Each group has a group number (starting with group 1), a size, and a name.
The group name is just the Group Base Name followed by the group number.
Below the list of groups are two additional entries, called unassigned
and group leaders.The left side of the frame shows a list of students who are currently signed in. Each is preceded by the number of the group that student has been assigned to. If you click on one of the group names, that group name is shown in red and the members of the group are highlighted in the student list. Members are shown in red with the owner in green. If you click on unassigned, the unassigned students are shown in red. Clicking on group leaders shows the group leaders in green.
Figure 3: Two versions of the group manage window, one using distribute by size and the other using distribute by number.
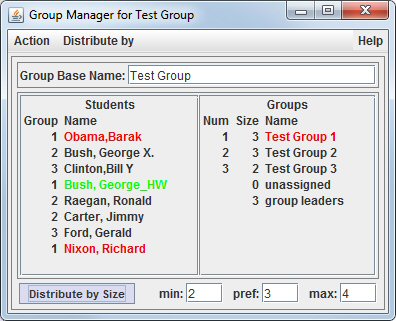
Two methods are provided for automatically dividing up the class into groups Choose one with the Distribute by menu item.
- Distribute by size:
The teacher selects preferred, minimum, and maximum group sizes and pushes the Distribute by Size button. This randomly divides the students into groups. Depending on the parameters, some students may not be able to be put into a group without violating the size requirements set. - Distribute by Number:
The teacher first sets the number of groups and then pushes the Distribute by Number button. This randomly assigns the students into this number of groups as evenly as possible.
Click on unassigned in the Group List and the unassigned students will appear in red. Click on another student to remove it from its current group.
Click on group leaders and the group leaders will appear in green. Click on any student who is in a group and that student becomes the current leader of his/her group.
There are two Actions available from the menu. Remove Students removes all students from the groups. Create Shares creates shares from the current groups.
Additonal Windows Menu Options
Student List Window
Use:
Windows -> Student List
to display a window containing a list of students.
The list is generated from the teacher's students.txt and from the
students who have signed in.
Six different types of lists are controlled by the Type menu option.
Most of these can be sorted in different ways using the Sort menu
option. Save Report can save a report in a file. The report includes
all of the report types.In the simulator, the Create Students allows you to create additional students.
The Student List lists the students with the ones signed in first. It allows you to remove students who are logged in. In the simulator you can also sign in (add) a student.
The Students Signed In lists shows only the students signed in. It shows their first name, last name, login name, assigned seat adn actual seat. Similarly, the Students Not Signed In lists those students who are not currently signed in.
The Students In Correct Seats and Students In Incorrect Seats show the corresponding lists. The Students Not In List shows those students who have signed in but do not appear in the teacher list.
Pictures
Use:
Windows -> Pictures
to display pictures of the students in the class.
Students who are currently connected will have their names displayed
with a yellow background. Pictures must be stored in the
pictures subdirectory of the teacher's directory, the one from
which the teacher program is run. Pictures can be in GIF, JPG, or PNG
format, but the default picture file name is generated from the student
name with .JPG appended. If you use a different extension on the
picture filename, or use a different naming convention, then the name of
each student picture file must be included in the corrsponding line of the
students.txt configuratiobn file.
Messages
Use:
Windows -> Messages
to display the Send Message To Students frame.
Messages can be sent to individual students or groups of students. The message appears at the top of the student's window and will stay there until acknowledged. Messages are of two types, those which just need to be acknowledged, and those that require a response.
The left window of Figure 4 shows the Send Message To Students frame in its default configuration. Seats with students who have signed in are shown in yellow. Clicking on one of these changes it to blue, selecting that stdudent to receive the message. Select any combination of students, enter the message, and push Send. The selected blue seats will change to pink. When a student responds, the color changes to green. The left window of Figure 4 shows a message that has been sent to students in seats 1 and 26. The student at seat 1 has responded, but the one in seat 26 has not.
By default, students only need to acknowledge having recieved the message. By clicking the Ack button at the bottom of the frame, it will change to Reply. This requires students to send a reply back. If the message requires a reply, clicking on a green seat will show the corresponding reply.
Figure 4: Two versions of the Send Message To Students frame, one by seat number and the other by name.
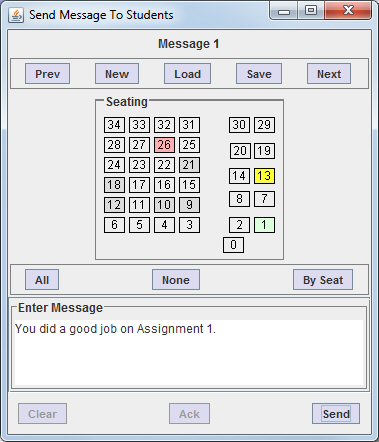
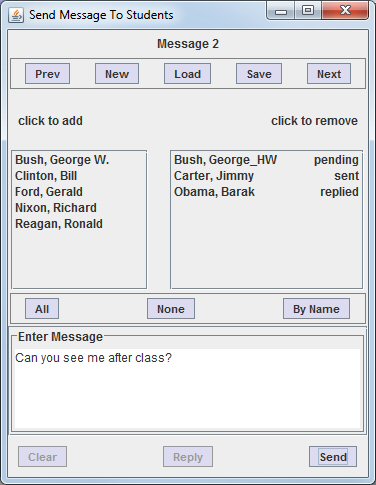
The window on the right of Figure 4 shows the result of clicking the By Seat button, which is changed to By Name. Now students to receive the message can be chosen by clicking on their name under click to add. They can be removed by clicking on their name under click to remove. You are allowed to choose students who have not yet logged in. In this case, messages will be held and delivered to them when they log in. Once the message has been sent, the state of the message is displayed next to the student name. The possible states are pending for students who have not yet signed in, sent for messages that have been sent but not acknowledged, and replied for those that have sent a reply. Clicking on the name of a student who has replied shows the reply that was sent. The right window of Figure 4 show a reply-type message has been sent to three students, one of whom has replied and one who has not yet logged in.
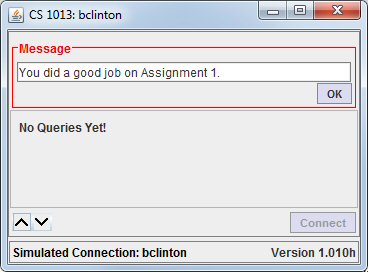
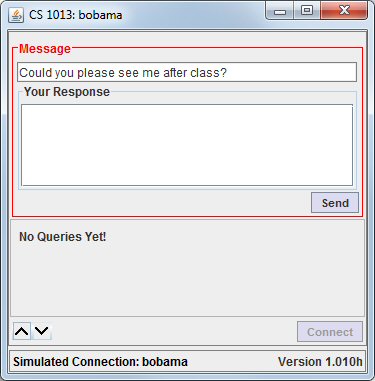
Figure 5 shows student windows corresponding to a message that requires only an acknowledgement (on the left) and one that require a reply (on the right).
Figure 5: Two versions of the student window after a message has been
sent.
The first message only requires an acknowledgement. The second requires a reply.
The first message only requires an acknowledgement. The second requires a reply.
Reviews
This pops up a teacher's review window, allowing a teacher to enter reviews. You still need to click on a review link in the responses area to choose a response to review. This is useful in that it moves the Review Frame to its standard position in case it cannot be found on the screen.Passwords
This feature lets you see which students have password set and allows you to see or clear the passwords. Passwords are usualy only used when students log in through a web interface.Greeting
This option prompts for a file name. The contents of the selected file is included in some of the reports that can be sent to the students.Show Frames
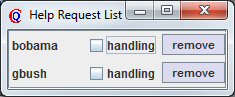
This options shows a list of all of the ClassQue frames and allows you to pin one frame to another so that moving the parent causes the child to be moved along with it.Help List
The brings up a help request list window as shown in Figure 6.If the Student Option called Allow Help is set, students get a Request Help checkbox. When they activate this checkbox, their name appears in the help request list. After help has been given the teacher can remove the student from the list. If more than one teacher is active, each teacher sees the same list. Selecting the handling checkbox for a student informs other teachers that help is being given. A change in one teacher's Help Request List is reflected in the corresponding list for other teachers.
Figure 6: The Help Request window.
All Queries
This brings up a window that shows all queries, similar to the All Queries window of the Query Creator.Playback
This has 2 options and is only available from the simulator.The options are Resume and Resume from server. The first will prompt for a state log generated by the server and will resume the program based on that log. You must move a state log file from the server to the local machine to use this option. The Resume from Server option requires a Classque Master Server to have been set up. It queries the server and allows the user to choose one the the previous classes to resume. A password is required. The master server password gives you access to all logs. A teacher password gives you access to those courses that use that teacher password. Setup and use of the master server is described here.
Report Configuration
This has two options Default Reports and Todays's Report. Each prompts the user for a file and that file will be used as the default or temporary report configuration file for that class. A temporary report configuration file is use once and discarded. If the Report Creator is not using the default names of the configuration file, the ClassQue Server must be configured with these configuration file names.Server
This has three options: Server Terminate Info, Keep Server Alive 10 minutes, and Keep Server Alive 1 hour. The first shows when the server is sechedule to terminate and the others allow you to adjust this time.New Teacher
This is available only from the simulator and can create a new teacher or a new assistant.Display Menu Options
Toolbar
This displays a toolbar in the teacher stats window that allows quick access to some of the features controlled by menus and some additional features not included in the menus. Each tollbar item has a tooltip to help understand what it does. Some toolbar items turn a feature on or off, in which case they have a red border when the feature is on. The toolbar is shown in Figure 7.
Figure 8: The teacher's toolbar.

The toolbar items (in order from left to right) are:

| Increase Font Size |

| Decrease Font Size |

| Normal Font Size |

| Show Reviews - on or off |

| Show Review Link - on or off |

| Show Grade Link - on or off |

| Show Correct Link - on or off |

| Show Evaluation Link - on or off |

| Set Response Summary Mode |

| Set Response By Student Mode |

| Set Response by Answer Mode |

| Force Update |

| Set Start Discussion |


| Allow or Stop Answers |


| Student Name or Anonymous Mode |

| Toggle Show Seating Chart |

| Repack frame |

| Dock or Undock the Response Window |


| Variable or Fixed Size Window |

| Remove the Toolbar |
Update
Update Now refreshes the response list. The other option lets you Set Manual Update if Auto Update is active, or Set Auto Update if manual update is active. Auto Update behavies differently for single queries and surveys. For single queries, updates occur only when students send an answer. For surveys, updates occur every 5 seconds.Queries and Shares
There are four submenus.
Queries and Seating: Shows both the seating chart and the queries.
This is the default.
Queries Only: Show the queries but the seating chart is not displayed.
Submitted Shares: Shows the contents of the submitted shares insead of the queries.
Current Shares: Show the contents of all shares.
Queries Only: Show the queries but the seating chart is not displayed.
Submitted Shares: Shows the contents of the submitted shares insead of the queries.
Current Shares: Show the contents of all shares.
Response
This chooses between the three types of response displays: Summary, By Student, or By Answer.Buttons
Allow you to show either a Wrap button, a Size button, or neither. The Wrap button allows you to turn on or off the wrapping of reviews. The Size button allows you to easily change the size of the font used in the response display.Review
This allows you to turn on or off five features of the response display: showing reviews, wrapping reviews, showing the review link, hiding review links for reviewed responses, and showing the correction links.Hiding review links for reviewed responses allows the review links (including correction links) to be hidden once a teacher has reviewed the response. This feature is useful if you want to quickly correct all responses.
Size
This has three options: Normal Size, Larger Size, and Smaller Size. They allow for change the size of the font used in the response display.Student Options
There are three sets of student options.The Share options, the Review options, and the Help options. They have already been discussed.
Query Options
There are three options under the Query menu.The first is chooses between Browse All and Browse Current. The default is Browse Current which allows the teacher to look at the responses for the current query, or for the current survey if a survey is active. The alternative is Browse All, which allows you to look at responses from all past queries.
The next option allows you to display or hide an Export link which can appear in the response list (except the summary mode for choices and checkboxes). Clicking on the Export link brings up a window containing the response of that student. All formatting is removed so that the contents of the window can be moved elsewhere using the clipboard. This is the preferred method of moving code into a program.
The last option is Start Discussion. This is used to indicate the time at which the teacher starts discussing the current question. It prohibits any further answers to the current question.
Return to the main ClassQue page
